Monday, November 23, 2009

Steampunk Harley Quinn: Sketched

As my previous post said, "On a moment of divine inspiration (and after enjoying my harlequin outfit so immensely), I decided to do a scrapper steampunk-ish version of 'Harley Quinn' from the Batman cartoons." My husband and I thought that it would make sense for Harley and the Joker to get dressed up to enjoy some Wicked (Festival) fun at the Mad Hatter's Tea Party.

I sketched out a few ideas and this is the result of several attempts and alterations. I wanted something that captured the feel of Harley Quinn, sexy but without losing the extremely cute and naive feel, while being more Victorian or steampunk in nature.

Main Outfit:
Fitted long overcoat; Halter or sleeveless top; High-waisted bloomers (as the pants) with ruffled bottoms and short suspenders or straps (as part of the bloomers) to hold them up.

Accessories:
Diamond shaped fake 'tattoos' to be applied to the skin; Lace pieces to be applied to skin for the mask; Mini-jester hat with white pom-poms; Four-sided 'cravat' consisting of three layers of ruffle on each 'flap'; Gloves with attached ruffles; Appropriate shoes or shoe covers; bi-colored stockings, tights, leggings, or long socks.

Any other accessories will be added later, if desired or necessary and time allows.

My husband's outfit will likely be much more a "dapper" style outfit, which will counter my scrapper style well, me thinks. I'm not really sure if he's finished his sketch yet.

The downside to having the sketch done is that I want to start work on the outfit, but really shouldn't unless I do it in small pieces at a time. I need to work on my Victorian Mourning Outfit some more, and I am already getting inspiration on the next part to make on that project.

Tuesday, November 10, 2009

Projects and Victorian Mourning Outfit Update


Oh why does inspiration strike as a flood rather than a trickle? Not that I'm complaining. It's actually great to feel the draw of doing more than speculating on tasks and actually starting the projects... and completing them again.

I've drawn a new idea for an outfit to use at the Wicked Renaissance Faire: Mad Hatter Tea Party this February. On a moment of divine inspiration (and after enjoying my harlequin outfit so immensely), I decided to do a scrapper steampunk-ish version of "Harley Quinn" from the Batman cartoons. She's incredibly cute, but I haven't seen many people pull off a stylized version of her successfully. They always seem to miss the mark, either making her too cutesy or too sexy, and not finding the balance between the two that the cartoon managed to capture. So this is my challenge to myself for that event. I've drawn up the sketch, but haven't inked or colored it yet.

My husband decided to follow the theme and make a dapper Joker outfit, inspired by the Batman comics as well. I think this should be interesting.

Unfortunately, as I was gearing myself up for the Harley Quinn outfit, my hubby reminded me that I still have yet to finish my Olivia (Victorian Mourning) outfit. Oi! Definitely heard the brakes screeching to a halt with that reminder! There was a chance that Brimsteam would have a game this month, but it was tenative at best. Still uncertain if that will happen or when the next game will be, which makes me less than motivated to start work on this outfit... though I really ought to get a few more bits done given how much needs to be accomplished with it. I can definitely have enough done to make it wearable regardless.

I also have a family portrait I'm being commissioned to work on, which I will start sketching out soon.

Lastly, I hope to be able to perform in the the 2010 Rakkasah Caravan (which I believe is in May). Call-in starts sometime in February, and it's a pot shot in the dark if we'll actually get in. Would be great though. My husband and I plan on doing a comedy type bellydance skit. He'd be a steampunk inventor and I'd be his cutesy dancing doll. I have some ideas sketched out for the outfit, though I'm still not satisfied, and we are working on ideas for music, props, and choreography. If we don't get in, we'll try for the next event which would be a month later in Long Island.

As a side note, there is apparently a Clockwork Ball that is starting up in Piscataway, NJ. The plan is that it will be held one Tuesday of every month for $15 per person. I'm seriously thinking about that too... and my Olivia outfit should possibly work for a few times! Hm... guess that might help inspire me.

So much to do... so much to do... :-)

Friday, November 6, 2009

Halloween 2009: Completed Harlequins!

Halloween is over, and the costumes were completed in time for Trick-or-Treating. Our son wore his costume in several stages of completion... once for our visit to Fright Fest at 6 Flags (an amusement park) and once for the Pre-Trick-or-Treat Party my mother and I held for the children in our family. He looked adorable each time, but the pom-poms that we added on Halloween morning was an absolutely adorable touch that really completed the outfit.

Anyways, my husband made his entire outfit, except the hat and the cummerbund.

I accepted help from him with the baby's and my outfits, mainly because I was running out of time. I made the body of the baby and mommy costumes and my hat. My husband made the neck ruffs and the baby's hat. The fabric pom poms were a joint effort. He measured, cut, and serged the edges. I gathered them, rolled them into "flowers", and then stitched them to the costumes.

As can be seen in the photos, my design changed slightly. I chose not to have pom poms down the front of my shirt. I felt they would get lost in the polkadots and might be awkward for carrying my son. Instead, I put a pom pom "flower" on my hat near where my ear would be. It really added a whimsical, feminine touch that balanced out the look perfectly.

Anyways, without further ado... pictures of the finished outfits. :-)


Tuesday, October 13, 2009

Halloween 2009: Baby Harlequin Jumper


I finished the Jumper part of my son's Harlequin costume. It's pretty much a perfect fit! I might make a few changes later, if I have time before Halloween.

My husband made the bias tape out of the original sleeves I cut (which were too short). I used that bias tape around the wrists and ankles as a casing for the elastic gathers. They are barely visible in some of the pictures below.

I part of the bottom inseam open so we can pull the outfit on over his head and to allow us easy diaper changes. The front has a short opening that closes with snaps, just for extra ease and comfort.

My mother has most of the pictures we took of him in the costume thus far. He was so cute, running round and squealing. Me thinks he likes the bright colors!

The jumper looks cuter and poofier (and longer) when he's walking around on his own. The pictures below don't really show that, but they do show how absolutely adorable the jumper is and how much fun my baby had in it.


So... I have his hat, neck ruffle, and pom-poms to finish to complete this outfit. I'm also thinking about making a quicky outfit for his monkey harness, which would be way too cute.

For now, I'm working on the base of my outfit, which I hope to finish cutting tonight and maybe even mostly stitch together by tomorrow night. My husband's outfit, on the other hand, is mostly done, though we don't have pics of it yet.

Anyways, off I go to finish cutting out my top and my pants. :-)

Saturday, October 10, 2009

Halloween 2009: Baby Harlequin Update

My son's outfit is mostly cut out. All I have left to cut is his hat and the neck ruffle. I used an animal/devil/angel pattern that I altered to have the appropriate bagginess. We plan to have snap opennings along the inseam of the legs for easy diaper changes and the outfit should be baggy enough to allow him to wear warm clothing underneath.

I hope to have the body of the outfit done tonight (except maybe the snaps) and the rest done by tomorrow night. Then I can start my outfit, which I'm far less concerned about since I can through something appropriate together from the renfest costumes I've gathered over the years. I'd rather not, but I do feel that the costumes for my husband and my son are far more important.


On a side note: Joann's has a fairly nice sale going on until Monday. Simplicity patterns are $0.99, interfacing is 50% off, and so on. I fell into temptation and got some patterns, interfacing, and several rolls of 'salvage bin' cloth cuts (under 1 yard... but enough to make small things with... like a baby blanket, an apron, etc). My husband also got three of the four books he ordered from Amazon on Victorian and Edwardian fashions. I can't wait to look at them. :-)

Monday, October 5, 2009

Halloween 2009: Family Sketches

"Hi" from the happy harlequins!

Halloween 2009: Harlequin Clowns

My husband and I decided to put our Brimsteam steampunk character projects on hold temporarily in preparation for our son's second Halloween. Last year was a fairly laid back affair since our son was so young and we, as new parents, were... well... new parents. The costumes were fun, but very simple, inexpensive, and much enjoyed.

(The baby's outfit was a skeleton sweatsuit w/ hoodie on sale from Babies R Us, while my husband and I wore some of my old goth stuff, which included men's pants, and some skeleton-rib T-shirts I got for free from Old Navy.)

Well, we are fairly adjusted to being parents (which includes the constant need to be flexible, work around the baby/toddler's schedule, and being ever so worn out). This year, we are going to make our outfits.

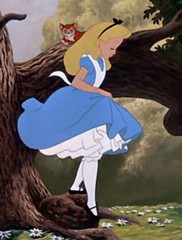
I always adored old fashioned harlequin clowns. My mother made my a couple my older sister and my youngest brother this type of clown costume and I always think they were adorable whenever I see the pictures. I also always wanted to make myself an old fashioned, baggy harlequin outfit. So... We decided that we would do so this year! What better time than when my son is so small and running all over the place with huge giggles and smiles! :-)

We already have the materials. I bought them last year on a super After Halloween sale from Hancock Fabrics. I bought them because I knew I'd want to make something with them... either Halloween gift aprons, comedic victorian outfits, or so forth. But when I saw them sitting unused I knew that they were destined to become this year's Halloween outfits!

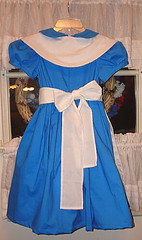
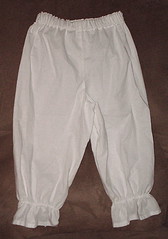
Below is my first concept drawing. I liked how the child outfit looked, but my costume wasn't quite right. I wanted something femme but flattering and old fashioned. Something like the swimwear from the Victorian era. This was far too fitted and not really pulling together well.


Next, I resketched my son's outfit-to-be, coloring it in to get an idea of how the striped material would look. I love how it looks. I found instructions on how to make the hat, the fabric ruffle pom-poms, and the neck ruff, all of which I can't wait to try. I'll put links to the instructions on here later, if ours turn out well. My costume, however was still not on par. I reworked the sketch a number of times, erasing and redrawing parts, but I just kept coming back to the thought that it was too complex and too shapely. I didn't like the idea of my costume being more difficult than my son's. That just seemed to defeat the purpose. I started steering away from the Victorian swimwear idea and was leaning more towards just bloomers and a baggy top with a sash, but it just didn't feel right to me.


Then, in a moment of clarity I drew the costume below. It's perfect. Baggy but femme. Old fashioned but flattering. Simple and cute. A proper French Clown but with harlequin leanings! I also have a pattern that should work pretty well for the base while I use the instructions I found for the ruffs and pom-poms.


Next time, I hope to post pictures of the cloth, but if not, at least pictures of the progress. I'm so excited by these projects and can't wait to start planning out how I'm going to cut my son's material... and my own. My husband is going to take care of his own outfit, which will be loosely based on the harlequin outfit Lord Peter Wimsey wore in "Murder Must Advertise". His progress will be able to be followed on the blog I set up for him: Sgt. Steampunk.

Sunday, September 27, 2009

Victorian Mourning Outfit: petticoat and skirt progress pictures

Photos of the outfit thus far. I need to add three ruffles to the bottom of the skirt and perhaps some ruffles to the petticoat.


I honestly am a little distracted by Halloween costume ideas and preparations. I'll write about those as well, as progress continues. I told my husband how I find it funny... for a while we didn't really work on anything and our days were pretty laid back. Now it feels like we are constantly on the move creatively.

Wednesday, September 23, 2009

Victorian Mourning Outfit: Updated Project List

Since I have more time to work on this project, I figured I might as well put together an updated list of project pieces I'd like to make for this outfit (by semi-priority). I'm also going to start working on other projects that will need to be done, like my family's Halloween costumes and the Pre-Trick O' Treat Party items. When the date for the next Brimsteam event is set, I'll start buckling down again. In the meantime, I will go at a slower rate, and work on it as I get the desire and/or time.

There are some Steampunk events that my husband and I are thinking about attending, which is more of a reason to flesh out our outfits.

Here's the updated list of what I need or want to make and/or buy, which is subject to change.

1. Blouse: Done. (Might make another, improving on the pattern.)
2. Skirt and Petticoat Combo: In Progress.
3. Bustle Pad. (Smaller than the one I made last February.)
4. Corset? (Debating, since I have one, but it's not a period shape.)
5. Vest.
6. Tie.
7. Gun(s) and Boffer weapon(s): In Progress.
8. Bloomers.
9. Hat, possibly with slight veil.
10. Camisole.
11. Short Jacket or Bolero.
12. Long Jacket or Coat.
13. Muff and/or Gloves.
14. Apron.
15. Stockings.
16. Parasol.
17. Traveling Desk/Pack, with journal/sketchbook and pen/quill.
18. Wig.
19. Sunglasses: Bought.

I hope to put pictures up of my husband's progress on his outfit too... With the mad dash rush to get things done by this Saturday, I didn't have the chance, but perhaps now one of us will be able to.

Victorian Mourning Outfit: Skirt and Petticoat

I got word today that Saturday's Brimsteam event was cancelled. They are looking into another date, possibly in November, for the next game, which on one hand has me concerned, but on the other hand is a relief. That gives me more time to flesh out the outfit and not go crazy trying to get the basic stuff done.

Work on the outfit has been moving along slowly. The skirt and petticoat are almost done. I decided to attach them to the same waistband, which means that even though I can't use them in different combinations, I have less to worry about when it comes to layers. Layers can be great when it comes to gaming, but it can also be a problem... especially with so many layers.

At this point, for the base of the skirt/petticoat, I need to add the last button hole to the waistband, sew the two buttons on, and hem the bottoms. Later, I plan to add ruffles, like the original sketch showed. I plan, however, to take photos before then, if for no other reason than to get a feel of how the outfit is coming along.

My next entry will be an updated list of what I want to make to complete this outfit...

Sunday, September 13, 2009

Victoria Mourning Outfit: Blouse (Complete)

Last night, I finished the Victorian Blouse for my Brimsteam costume. It turned out really well, especially for my first attempt. The collar is very high, the ruffles around the neck and wrists are small and dainty. The points don't land right in the middle of my hand, but my husband and I both agreed that it added a nice touch to the blouse, so I'm leaving it that way. The sleeves are also a little long, but that also seems very fitting for the character. When I checked how the sleeves would look if the I shortened them, I didn't like it nearly as much, so I'm keeping the sleeves as they are.*

I did learn something new. Buttonholes. I've never done them before and I LOVE them. My husband showed me really quickly and gave me a 'heads up' on one problem my machine has with them. Now, most people with enough sewing experience will tell you that each sewing machine has its own personality. Since I'm used to my machine's 'issues', I was able to figure out how to get the buttonholes to turn out perfectly by the third buttonhole. :-)

I'm currently debating if I should make a tie like the design I drew shows or if I should make a cravat instead. I have experience with making cravats, and it would look very appropriate. Perhaps I'll just make both if I have the time. I really ought to just make the tie.

The funny thing is how young I look in the blouse, as if the high collar makes my face look more youthful. Really, I look like I could pass for a teenager. It also makes me look like I'm wearing make up with is pretty amusing too. I was a little concerned that the high collar and the plain front might make my face look too fully or my head look too big, even though that seemed to be the desired affect back then. A friend to me recently mentioned that she avoided high, closed front collars because of this. Well... I think it suits me and I'm glad I tried it.

There are a few changes I would make to the design if (when) I make another shirt in this style. The basic layout of the shirt is nice, but I'd want to tinker with the cut to make it a bit more flattering, especially on an hourglass figure. I would shorten the space between the shoulder and neck and I'd probably make the armseye (armhole) smaller and the shoulder of the sleeve smaller as well... maybe add a gusset instead. This would make for better movement, though I'm not sure how that would affect the overall look. The sleeves would be more tailored as well, perhaps with button closures n the wrists. (I do like me some wrist buttons.)

Above are pictures of the materials I plan on using. Obviously, the shirt material is already used at this point, but I figure I might as well (finally) post the images I took. The color scheme is very appropriate for a mourning outfit in the second or third stage of mourning. Next item to try to finish, the skirt and underskirt (petticoat).

As a side note, the gun in the pictures is one of the Nerf guns my husband is modifying for the games. So far, as you can see, it's looking pretty awesome. :-)

* I like to keep a more fluid outlook when I'm sewing. It's something I learned over the years, especially in art school. Sometimes, it's best to stay rigid with a concept, but sometimes it's best to be flexible. I tend to lean towards flexibility. My husband tends to lean towards rigidity. We balance nicely.


Wednesday, September 9, 2009

Victorian Mourning Outfit: Blouse

The work on the blouse is coming along. I had to make several changes to the base patterns I chose to use, including the handling of certain pieces (including leaving the lower sleeve and the under part of the sleeve puff as one consistent piece).

The neck and wrist trim is going to be puffed ruffles made of the same black broadcloth as the rest of the shirt. This will hopefully add a hint of femininity, but not to the same extent as lace. I am not going to cover the front seams of the blouse with trim, which is what is done in the pattern design (below).


At this point, the blouse is probably about 50% done. My serger's settings were off, so it took a huge chunk of time and energy to get it back to some semblence of where I wanted it to be (thankfully, my husband helped out when I finally admitted a temporary defeat). What's left for the blouse are: 1. stay stitch the tops of the sleeves together, 2. stitch the seam of the sleeves, 3. attach the sleeves to the blouse, 4. attach the puffed ruffles to the bottom of the sleeves and the collar, 5. attach the collar to the blouse, 6. hem the bottom of the blouse. Hopefully after all of that, I will be able to take completed pictures of the blouse, unless I decide it needs something more. Then I get to figure out what I need to do to finish the skirt and possibly what I want to do for a petticoat.

Saturday, September 5, 2009

Victorian Mourning Outfit: Design and Prepping

I finished the outfit design last night. I also did more research on Victorian mourning attire and traditions. The fabrics I have will be fun to try for this outfit.

Before I explain the outfit, I want to note how humorous I found the choice of date for the Brimsteam game. 1889 is during the last hoorah of the bustle, where they were bigger than before (making women look like they are semi-centaurs). A few years later, huge mutton sleeves were the rage, and the huge bustles set aside for "simpler" skirts. Oh, what to do? Well the image is how I am handling a possible "in between" late 1880's to early 1890's inspired Steampunk larp outfit base.

The top image with just the vest was the original vest design I was going to try. It has an assymetrical front closure, but I decided to change it to a plain front, due to time constraints. I do hope to make this vest too; eventually.

The full front figure shows most of the outfit, except the short jacket (or bolero) seen in the center and last sketches on the top row. The bottom of the sleeves, however, are going to likely be different, ending in a point rather than a blunt hem. The dress may or may not use a bustle or a small bustle pillow. Still undecided.

The colors are appropriate to later mourning attire; deep blacks and dark purples. The fabrics will be mainly cotton and a little velvet-like velour or velveteen. Some trim and frog closures are also at my disposal for this outfit, if appropriate. Photos of the cloth, trims, and pattern bases will be added when I download them off my camera.

The cloths are preshrunk for the most part, and the patterns have been looked through. Priorities are as follows:
1. the shirt
2. the skirt
3. the vest
Anything beyond those before September are icing.

**My husband may also post his progress here too, unless we start a different blog for him.

Friday, September 4, 2009

Brimsteam photo of us! :-)

Here's a great picture of the (partial) NPCs that my husband and I played at Brimsteam during our brief visit. The woman who plays Madlynn took the photo and photoshopped it.

These are not the characters we hope to start with, but more like the protypes of our more light-hearted pair, Daisy and Horus.

More photos of the events can be seen at the Brimsteam website's image gallery.

Thursday, September 3, 2009

Victorian Mourning Outfit: New Project

I've been doing research on Victorian fashions a lot of late. I has the desire a few years ago to make a nice Victorian dress, but never got around to it. I think this was because I didn't really have anything to use it for.

Over the last year, my husband and I started getting into the Steampunk subculture, him moreso than I. We went to the Wicked Renaissance Festival in Whippany, NJ, which had a steampunk section. My husband's first outfit turned out very nicely (and he won the prize for Best Men's Outfit). My outfit wasn't bad, but it did lack direction. I just couldn't really figure out what I wanted to do, what sort of persona I was aiming for, and realized that I quickly ran out of time in what I did want to get done. Ah well, 'tis how things are at times.

Last weekend, my husband and I went to Brimsteam, which is a NJ and PA based steampunk LARP. A buddy told me about it a few months ago, and ever since, my husband has been gungho to go. So we decided to go for a couple of hours to get a feel; not NPCing, not playing. Because we were dressed the part (since we didn't want to detract from the atmosphere), we were allowed to "play" for a couple hours for free. I do have to say that I really enjoyed interacting with the people, and like the fact that it seems to have a more mature crowd than what I'm accustomed too. Yay for the possibility of less drama!!!

So, after we left the game, we started working out the kinks in our main characters, Olivia and Nigel, and altered them a bit to fit the "feel" of the game a bit better. We talked about costuming and such, which is something we discussed before, but now felt the strong inspiration to really buckle down. The following day, we picked up cloth to get started.

My cloth is all dark so far and cotton: plain black and black with a dark grey pattern. Olivia is not a goth type character, but is in mourning. I found a website that talks about the various stages of mourning, so I am taking some inspiration from that. Sadly, this is bound to be an expensive outfit given the large amount of materials needed... and I'm not sure I'll have it completed by the next game... which is only 3 weeks away (according to my husband).

We are narrowing down different options for these character outfits and figuring out designs. We are also going to make a list of priority items that we feel we *need* for the upcoming game. My husband is working on the NERF gun modifications, though I know there's a chance that my character might not have hers yet. I will be setting up a blog for him to post his projects on, much like I am doing with this one.

More (on design ideas and possible a sketched design of my own) later.

Wednesday, September 2, 2009

Alice In Wonderland Update: Complete!!!

The outfit was sent on August 18th and arrived on August 27th. My friend and her daughter did a photo shoot and sent me a number of great pictures. I am posting them here with their permission. I can hardly wait to get the photos they plan to take at Disney World, especially with how wonderful the pictures below turned out!


Close shots.

Front of the outfit.

Back of the outfit.

The blue dress without the apron.

A shot of the bloomers.

Following the little rabbit.

Alice In Wonderland Update: Details

Not all the details that we fixed and added are shown here, but the main two are.

Below are images of the bloomers with the added bow detail and the wrist-purse I made as a special surprise for J out of scrap bits of cloth and bias tape. The wrist purse is made of blue cotton with a white cotton lining. The white line is carefully stitched bias tape, as is the cording. I didn't post these earlier because I wanted the purse to be a surprise when J openned the box. Photos from my friend with J wearing the outfit to follow.

Wrist Purse

Bloomers with bow on front.

Monday, August 17, 2009

Alice In Wonderland: Nearly finished!!!

My husband and I have a few small details to finish up, so minor that they really are us just being picky. We want to add a small bow on the front of the bloomers just to make it easier for my friend's daughter to know which way is front. Then I have a couple seems (only a few centimeters in two spots) to reinforce. My husband is going to reinforce the serge areas where the torso, petticoat, and skirt are joined, since he cut them down to make the zipper work easier in that area of the back, though this is only an inch on either side. He's also going to rework the zipper top to make a more finished look, because I felt it wasn't up to par as is. I believe that's all. Well... that and I have a surprise I hope to send too... "Hope" is the key word but I think it would be nifty.

Now for the pictures. Nevermind the yellow tone in the photos. I took the pictures at my mother's house, and her overhead light in that area gives a golden hue that I forgot about. It also made the cloth seem shinier than it actually is. I hope to get better pictures when the items are 100% complete (though really, our little changes won't be a noticeable difference... but the comparison shots between the cartoon stills and the final project might look more on par).

Alice's outfit: front and side

Alice's oufit: back

Alice's outfit: petticoat and bloomers