
I've been making more and more jewelry, but with a bunch of "icky sickies" in my family, my creative bug has been a bit sluggish these past few weeks. Orders are still coming here and there, and I have listed a few items on Etsy (and sold a couple things through there). I am planning on working on new designs and techniques too. I've already started to explore wire wrapping, but haven't listed any for sale... instead I gave two away as presents to coworkers, made three to give to my nieces and nephew (one each), and have kept the other three for myself (for now). Wire wrapping, however, may open the door for even more styles and types... For now, my etsy shop's name is "Melusine's Jewelry". I'll explain the story of Melusine another time. My FB artist page (Manky Cat) has examples too, though I have more to add.
Ideas to explore for the marbles, gems, or jewelry designs...
Marbles/Gems:
* Glass etching
* Gold and/or silver leaf added to the backs
* Glass painting
* Upcycling materials into findings and focals
* Metal clays to make silver pendants
* Make my own wire findings
* Ribbons w/ clasps to use in place of chains for some pieces
Jewelry Designs and Pieces:
* Goddess-themed designs - so far I have concept designs for Freya, Iris, Kali, and Persephone
* Movie/Literature designs - example: the golden snitch from Harry Potter and Katnis's Pearl from the Hunger Games Trilogy
* Hairsticks, headbands, hair clips, bobby pins
* Ear wraps
* Small tiaras
I've already done some cuffs and bracelets, fish hook and post earings, rings, and a headband (but want to try a different method next)... Lots of pendants, lariat necklaces and so on have been done, but not toggle front necklaces.
I also want to make a sand garden with colored sand and crackled marbles/gems as decoration. I'm also thinking they would be great for game pieces too.
Friday, December 9, 2011
Wednesday, September 21, 2011
Fried Marbles
I've started a couple new projects... Surprise, surprise! For now, I'm going to talk about...

This is a new passion that started me on the path of actual jewelry making. I mean, I've made jewelry before, but not like I do now. I started this trek back in July and find myself semi-addicted.
What started this? I went to an Amish Market/Flea Market with my mother, husband, children, nieces, step-nieces, and older sister. I had an odd feeling to look for "something". I get these little feelings every now and again, and usually it leads me to something that I find quite intriguing or beautiful each time, which then starts some new journey for me. Is this intuition? Maybe. Luck? Possibly. But it happened enough in the past that my husband doesn't question me or give me a hard time. To the contrary, he actually enourages me to pursue whatever is causing that feeling for me.
So as we are walking through the market, perusing the wares from different sellers, I came upon these...
 They were exactly what I was looking for! They actually reminded me of something from my past. Flashback: There was this boy I met while I was in 5th grade. He and I became close friends quickly and met every morning in the halls before class started, sat together in chorus, and hung out after school sometimes. We used to talk on the phone often and I got well acquainted with his parents as well. Each birthday and Christmas, we gave eachother gifts. I still have those gifts, though I don't know if he does. Towards the end of our friendship, he told me how he still had them on a special shelf in his bedroom. I was flattered, though at the time I didn't realize the importance of such a confession. One year, he asked me what I wanted for Christmas, and I said, "I want a bubble that will never break." From then on, I still held to that desire... to find a bubble that will never break; it's fragile beauty maintained without fear of being lost. These little marbles and pendants reminded me of this and I had to have one!
Little did I realize that one of the people selling these was an ex-coworker of my husband's (one that he's mentioned a number of times, so name recognition was immediate). My husband and his ex-coworker talked for a while as I nearly drooled on the table in sparkly, glassy loveliness. I searched out the perfect ones to buy... (I ended up with three pendants, one set of earrings, and bought my nieces one item each. My sister didn't want me to buy my step-nieces some, so I respected her wishes on it.)
More importantly... I found something deeper. I found inspiration.
I started researching how to make them. That same weekend, I bought marbles (medium flat ones and small round ones, and also had a few I saved from other uses years ago) and started testing different methods. Back and forth I went, reading experiences of others, testing them out, and going back to find more experiences to try. To be honest, I'm still testing what methods I like best for what purposes, but I'm definitely much further along than I was when I started. My husband also seemed to enjoy the process of helping me come up with ideas on better techniques and after a couple weeks, I showed my nieces and nephew how to do it (giving them each one medium clear round marble and one small round yellow one that they fried and cracked).
Fried Marbles.

This is a new passion that started me on the path of actual jewelry making. I mean, I've made jewelry before, but not like I do now. I started this trek back in July and find myself semi-addicted.
What started this? I went to an Amish Market/Flea Market with my mother, husband, children, nieces, step-nieces, and older sister. I had an odd feeling to look for "something". I get these little feelings every now and again, and usually it leads me to something that I find quite intriguing or beautiful each time, which then starts some new journey for me. Is this intuition? Maybe. Luck? Possibly. But it happened enough in the past that my husband doesn't question me or give me a hard time. To the contrary, he actually enourages me to pursue whatever is causing that feeling for me.
So as we are walking through the market, perusing the wares from different sellers, I came upon these...

Little did I realize that one of the people selling these was an ex-coworker of my husband's (one that he's mentioned a number of times, so name recognition was immediate). My husband and his ex-coworker talked for a while as I nearly drooled on the table in sparkly, glassy loveliness. I searched out the perfect ones to buy... (I ended up with three pendants, one set of earrings, and bought my nieces one item each. My sister didn't want me to buy my step-nieces some, so I respected her wishes on it.)
More importantly... I found something deeper. I found inspiration.
I started researching how to make them. That same weekend, I bought marbles (medium flat ones and small round ones, and also had a few I saved from other uses years ago) and started testing different methods. Back and forth I went, reading experiences of others, testing them out, and going back to find more experiences to try. To be honest, I'm still testing what methods I like best for what purposes, but I'm definitely much further along than I was when I started. My husband also seemed to enjoy the process of helping me come up with ideas on better techniques and after a couple weeks, I showed my nieces and nephew how to do it (giving them each one medium clear round marble and one small round yellow one that they fried and cracked).
And then, I picked up more supplies and started making some of them into jewelry. I wore a few pieces, gave a couple away (to be tested and reviewed by some friends) and made a few as gifts, and sold a few as well. To see more examples of what I've been making go to my Facebook Page: CLICK HERE. Whenever I wear the ones I've decided to keep, I get compliments, and the people who have bought some from me (and my testers as well) urged me to put some up on Etsy. (My store is Noblesse Excentrique, my user name is mankycat. Click here to go to the store.)
Here are some examples:
 |
| Ring with silver plated base: Mine! |
 |
| Drop Pendant: Sold! |
 |
| Strand Pendant: Sold! |
FYI: I hope to put up a tutorial on how to make them soon. :-)
Tuesday, September 20, 2011
Star Wars Birthday Party (w/ many photos!)

We scoured the internet and our own recipes to come up with ideas for party foods. We came up with names for each item and my mother had tiny images printed out that we could attach to the food-name cards. (She definitely thinks of details I completely forget about!)


Dark Side Birthday Boy Cake: Gluten Free chocolate and vanilla (dyed red) cake batters, marbled, with chocolate frosting Clone Ration Cakes: same batters as above, spooned into mason jars and cooked as cupcakes. Topped with Clone Trooper Candy Pops, following this instructable with personal alterations. May use a different method next time, as the kids loved the look but didn't like the taste of them. (We also made Rex for the birthday boy, because Rex rocks!)Cloud City Floats: Rootbeer or Sprite topped with vanilla ice cream
Chewie's Chewy Chocolate Chip Cookies: Cookies (some with and some without chocolate chips) cut into Star Wars shapes using these cookie cutters.


 |
| The littlest Clone Trooper. |
I meant to post about my son's STAR WARS party a while ago, but never got around to it. I'm now determined to do so!
When I started planning my son's party, I knew my mother would be more than happy to jump on board. She loves planning themed events. There was a time while we were living in NJ when the running joke was that if there was a "holiday" to celebrate, she'd have a themed dinner for it. Chinese New Years were always awesome, as were her many other events. It's one of her creative outlets, me thinks. But since the move to MD, the themed dinners seemed to tone down a bit, which is nice, but also something I miss. I wanted this party to be easy to prepare without being skimpy.
This also being my son's first fully themed birthday, with games and party invites, made it just that little bit more special. Sadly, three of the 6 kids we invited (only one being not related) couldn't attend, but I took this as a nice treat for the others and him, and a good practice run for his next birthday. He's starting daycare next Tuesday, so there's a higher chance of more non-relative kids being invited.
My mother, husband, and I worked up many ideas, and in the end the party was a success. We didn't get through all the games... the kids were worn out quickly all but my son and my youngest niece ended up taking naps! :-p
The Invites
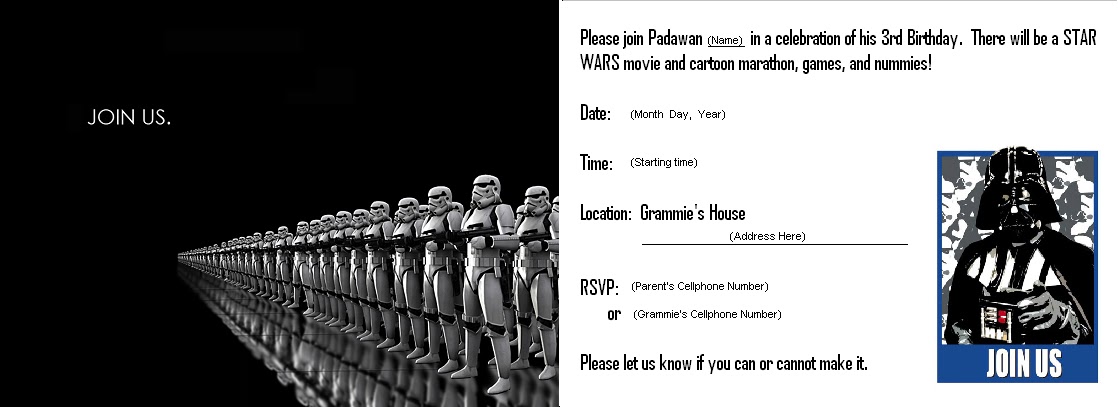 |
| I altered the original images to use for the invites. Original images from http://www.wallchan.com/ (left) and blogonsushine.blogspot.com (right) |
As the invite shows, this party is more of a "Dark Side" or Empire themed Star Wars party. My son was hooked on all the Star Wars films and the Clone Wars cartoons... but he mainly seemed to like Darth Vader, Boba Fett, and the Clone Troopers (and Storm Troopers by default). I do see the irony thus far in calling him a Padawan in the invite.
The Dinner Menu


Now for the menu details!!!
Death Star Cantaloup: 2 Cantaloups, one carved as the Death Star, the other being the remains of Alderaan.
Boba Fett-uccine: Gluten-Free noodles w/ olive oil, butter, herbs, and shredded Parmesan cheese.
Boba Fett-uccine: Gluten-Free noodles w/ olive oil, butter, herbs, and shredded Parmesan cheese.
Obi-Wan Fruit Kabobs: Strawberries, grapes, and marshmellows on skewers
Dagobah Salad: Cold pea salad with cubes of cheeses
Bantha Ribs: Ribs slow cooked (crockpot) in Bone Suckin' BBQ Sauce
Tauntaun Legs: Brown-Sugar BBQ Chicken legs using a Martha Stewart recipe
Ewok Salad: Salad greens with nuts, shredded carrots, raisons, and dried berries. Mom made a homemade raspberry dressing.
Tusken Raider Taters: Just some oven baked tater tots
Yoda Soda: A green party punch with seltzer (for bubblies) and lemon sorbet on top
Chalmun's Canteena Coffee: unsweetened vanilla flavored iced coffee (sugar on the side)


The Dessert Menu
 |
Nothing says "Happy Birthday" like clones heads on pikes over bloody mounds of dirt! |
Chewie's Chewy Chocolate Chip Cookies: Cookies (some with and some without chocolate chips) cut into Star Wars shapes using these cookie cutters.
  |
Vader says, "Come to the Dark Side. We have cookies." |
Entertainment / Games
 |
There were no prizes for "winning." The idea was just to have fun! It worked! |

Star Wars Marathon: We had all the Star Wars movies and the Clone Wars cartoons available. I believe we started with the cartoons, and then switched to the movies after the kids started winding down (some having fallen to sleep).
Make A Light Saber: Using foam swimming noodles (cut in half) and duct tape, the kids made their own light sabers to use for other games.
Jedi Vs. Sith: Basically, we just let the kids beat on eachother using the foam light sabers they made. No hits to the head and no tackling (except the kids tackling the adults). Who were the Jedi and who were the Sith? Who knows? The point was just to have fun. My brothers even joined in this one.
Feed The Rancor: We took a large moving box (leftover from our move) and cut a hold in it. My husband took some moving paper leftovers and drew a Rancor beast on it (from Episode 6: Return of the Jedi) and attached it to the box (with a whole for the mouth). The kids threw bean bag type balls at it to see who could get the most in.
Death Star Scavenger Hunt: Party favors wrapped in aluminum foil and hidden. Each with a child's initial on it.
Light vs. Dark Balloon Pop: Small party favors inserted into balloons. Several clusters of balloons are tied to chairs and marked with a child's initial. (These serve as place markers for the seats too!) The children then pop the balloons, using toothpicks, to find their favor.
Jedi Training: We didn't get to play this one, but the idea was that we had a bunch of small balloons blown up. The kids would use their foam light sabers and try to keep the balloons off the ground. They can keep trying until their balloons pop on the grass. Sadly, the kids were worn out, so we didn't bother pulling the balloons out.
Birthday Boy Recruitment: My husband pulled out the costume he made for a convention years ago, complete with voice changer. It was a character he made up. He threw it on so he could have an Empire type character give my son a Clone Trooper suit of armor which he made from cardboard and packing paper leftover from our move, which he sculpted and painted. It turned out great and matched the Rex helmet we got him perfectly. The best part was the look on my son's face when my husband appeared. He thought my husband was "Boba Fett"!!!
 |
| If cookies weren't enough, the Dark Side also will send some of their celebrities and a free set of custom made armor! |


Decorations
My mother hate streamers, so we avoided those (this time!), but we hung up a bunch of Star Wars images, mostly in the style of WW1 and WW2 wartime propoganda posters. The adults enjoyed reading them and getting the humor of them. We also had balloons tacked and tied around the house and outside.

Overall Review
In the end, the party was a success. The children and the adults had a good time. The preparations were easy enough, but were definitely not lacking. The food was delicious, the games fun. The children were well occupied until they started running low on energy, and the adults were entertained with inside jokes, little bits of irony ("Your son will remember how Daddy was never around for his birthday cake." and "Great. The Padawan turned Empire."), and movies that transcend age.
  |
| Image from http://www.joecorroney.com/ |
Monday, July 11, 2011
Completed Misc. Projects!
As usual, I've been busy making things while also working on other interests. Here's a few of the projects I was working on.


For my son, I was planning on making at least a pair of shorts for the holiday and to find one of the patriotic t-shirt hand-me-downs we have. My mother's boyfriend (Granpappy) had also bought my son a shirt from Washington D.C., so I ended up making shorts to semi-match the shirt. This outfit had a few firsts for me. My first use of seersucker fabric. My first applique. My first attempt to temporarily size down a t-shirt.

Here's the story... The store Granpappy was buying the onsie and t-shirt from only had this t-shirt in a size 4 and a size small (usually size 6). Since my son is currently wearing size 4 to 5, my mom suggested he buy the size small. The shirt was huge for him, but I figured that I could figure out a way to size it down, while allowing me to later undo my alterations so he can wear it for years more. (If you click on the photos, you'll be able to see the alterations more clearly. Just another case of an outfit I hope to take more pictures of!)

I didn't get any "before" pictures, but the "after" pictures show how well it turned out. My mother said it looked like it was bought that way. And her boyfriend was impressed enough that he came home with a shirt from the Monster Truck Rally he went to and said, "You can work your magic on this one!" :-)
As for the shorts... my son loved them! He actually wore them again a couple days ago with one of his Star Wars t-shirts. I plan to make him a matching vest or shirt. Either would be adorable. (Maybe a matching hat?)
As a side, I made some really cute Fourth of July hair clips out of scraps (pictures later) and tried to rework a blue striped maternity top I love. I want it to be more flattering to my non-pregnant figure. This first attempt was a little rushed. I wore it on the Fourth of July, and though it looked less "maternity", it wasn't up to my standards for fit or quality, so I will be working on it more. Possibly even take it completely apart. We'll see.
Also, for a Refashioning Co-Op that I'm part of, I made a collar headband. The group was having a book giveaway, and the theme was using scraps. My husband likes to make Victorian style shirts, and if he's converting a modern shirt to be one, we end up with the collar, sad and lonely and begging to be used. It seems happier now.
Before:

After:

What's now on the list of "Try To Make"?
* Rework the blue stripe maternity top
* Alter pink stripe maternity top
* Fried marble pendants and lace chokers
* D&D dice pendants
* Alter brown polkadot dress (into a top and skirt)?
* More seersucker stuff for my son, daughter, possibly me and my husband too
* Possibly convert small onesies into tanktop dresses for my daughter
* Sketch jellyfish steampunk gown
* Start work on Xmas gifts?
* Build my photography portfolio (for my new artist facebook page)
* Post about the Star Wars birthday party!
* Post about the Star Wars birthday party!
Sunday, May 29, 2011
Refashioned infant outfit: one-day project
Today (Saturday, actually) I quickly made an outfit for my daughter. I love making children items... they usually seem to take so much less time!!!
I am part of the Refashion Co-op, and one of the rules is to add a new refashioned item entry every month or your membership is revoked to make room for one of the many applicants waiting to join. I like being part of this group, because it forces me to actually buckle down. I have so many things I want to refashion into items we will use or other projects I keep saying I'll do "one day". This group inspires me to do these things... and my creations seem to be helping inspire my husband too.
I used three items to make this particular outfit:
1) An infant top that costed me $1.25 at Target (on clearance).
2) An old sleeveless top I haven't worn in ages; it was too short for my postpartum body, but I loved the embroidered botanical design.
3) A hand-me-down onesie that was given to me for my son, but my daughter didn't get to wear before she outgrew it. I really liked the colors, especially the dragonfly applique.


I unpicked and cut the bottom off one part of the onesie (either the front or the back). From that fabric, I made three yoyo flowers which I attached to the infant shirt. These were my first attempts at yoyos, but they turned out pretty well.
The skirt of this section took a little longer, with some failed attempts. I'm not accustomed to sewing knit fabrics (beyond minor alterations and repairs), so this was definitely a learning process. I unpicked the edging and shoulder straps of the sleeveless top. I then turned it over and hemmed the part that was now the bottom. Actually, it took several tries... with some unpicking of stitches... Did I mention I'm not used to sewing knits? I tried altering the top's hem into a waistband but messed it up. Then I realized I could do something like the lady at MADE did for her circle skirts and which I've also seen done on skirts in some retail stores (one of which I also bought on clearance). Basically, I combined the two ideas and was really pleased with the results!
That's pretty much all there was too it. I hope to have my daughter wear the outfit tomorrow (Sunday... which it technically today if you go by my clock) or on Memorial day!
I am part of the Refashion Co-op, and one of the rules is to add a new refashioned item entry every month or your membership is revoked to make room for one of the many applicants waiting to join. I like being part of this group, because it forces me to actually buckle down. I have so many things I want to refashion into items we will use or other projects I keep saying I'll do "one day". This group inspires me to do these things... and my creations seem to be helping inspire my husband too.
I used three items to make this particular outfit:
1) An infant top that costed me $1.25 at Target (on clearance).
2) An old sleeveless top I haven't worn in ages; it was too short for my postpartum body, but I loved the embroidered botanical design.
3) A hand-me-down onesie that was given to me for my son, but my daughter didn't get to wear before she outgrew it. I really liked the colors, especially the dragonfly applique.

Here's what I did...

I unpicked and cut the bottom off one part of the onesie (either the front or the back). From that fabric, I made three yoyo flowers which I attached to the infant shirt. These were my first attempts at yoyos, but they turned out pretty well.
The skirt of this section took a little longer, with some failed attempts. I'm not accustomed to sewing knit fabrics (beyond minor alterations and repairs), so this was definitely a learning process. I unpicked the edging and shoulder straps of the sleeveless top. I then turned it over and hemmed the part that was now the bottom. Actually, it took several tries... with some unpicking of stitches... Did I mention I'm not used to sewing knits? I tried altering the top's hem into a waistband but messed it up. Then I realized I could do something like the lady at MADE did for her circle skirts and which I've also seen done on skirts in some retail stores (one of which I also bought on clearance). Basically, I combined the two ideas and was really pleased with the results!
That's pretty much all there was too it. I hope to have my daughter wear the outfit tomorrow (Sunday... which it technically today if you go by my clock) or on Memorial day!
"It's the high level of quality I've come to expect from you."
- my husband
Sweetling's Faery Wings: Completed!
 The wings came together very well and looked adorable. Unfortunately, the day we were going to go to the Faery Festival, the weather was supposed to be Thunderstorms. We nearly chose not to go, but at the last minute that morning, we packed up and left. Got lost for an hour and a half (two unconnected roads named the same thing? Really???), but we finally made it. We didn't get many pictures though and didn't wear much in the way of costuming. My daughter and son were still cute as could be. So much so that my older sister hijacked Sweetling. I don't blame her... Who can resist?
The wings, being of simple construction, actually made it through the day. One of the arm straps did come partially off at the end, when my sister carried her facing outwards (fresh fear of spit up, my husband thinks), which meant the wings were being put into an awkward angle, something that would have been an issue for many wings. That's okay though; they are easily repaired! :-)
I'm so happy with how these turned out. Not bad for cardboard, floral tape, iridenscent tissue paper, scrap ribbon, and hot glue!
Thursday, May 12, 2011
Sweetling Faery Wings: Possibly (or nearly) done
The faery wings for my daughter are nearly complete. They are made of cardboard (because we have plenty of boxes and it seems such a waste not to reuse them in other ways), iridenscent tissue paper, floral tape, ribbon, and hot glue. I may add snaps to the ribbons; originally I was going to use white elastic, but couldn't fine it. I also may add flowers to hide the snaps. One thing I definitely need to do is dust them with baby powder or cornstarch to remove some (or hopefully all) of the outer stickiness on the outside parts of the floral tape.

The first idea was to cut out the cardboard pieces to be one layer, then cut out card stock paper to be another layer, and to sandwich the iridescent tissue paper in between. Sadly... this idea did not work. The floral tape did not stick to the card stock, and it was too flimsy to really force the tape to work. I also tried duct tape (which is the only other thing I felt was dispensible enough to use in case of failure), but that didn't work too well either. I thought about coloring the card stock and then using it as planned, but decided that it would not be strong enough and the edges would be too "clean cut". Instead, I figured I woud just be rid of the third layer. The problem was, I wasn't sure how the tissue paper would look without the extra layer to hide the bulk of it. I also wasn't sure how well it would adhere to the wing frames. I wasn't disappointed. I was fairly careful not to touch the hot tip to the paper and to also work in bits.


I also needed to figure out the connector piece, but that was simple enough. I took some scrap cardboard from the Clone Trooper armor my husband is making, cut it in with a slight bit of stylization, and covered it with floral tape. It actually took a few attempts to get the tape on the way I wanted, but I was very happy with it when I was finished.
The last thing I needed to do for these wings was to figure out how I wanted them to be worn. I already thought I'd simply use white cloth covered elastic like what people tend to use for sleeves and such, but I couldn't find the ones I just bought. I really did not want to use black on this since her outfit would likely be white or a pale color. I decided to use some pale transparent pink ribbon I actually bought to possibly use on her Spring/Summer dress (but didn't). I hot glued them in place and they actually look really nice. They definitey work well with the color scheme.


The last few things I might do is add snaps to the ribbon and cover them with fake flowers or leaves. I'm not really sure I will do that. All in all, however, these wings are done and I will try them on Sweetling tomorrow.
Then it's back to working on my son's outfit, which I am keeping in mind that he might choose not to wear. :-p
Subscribe to:
Posts (Atom)