Showing posts with label for my son. Show all posts

Tuesday, September 20, 2011

Star Wars Birthday Party (w/ many photos!)


The littlest Clone Trooper.

I meant to post about my son's STAR WARS party a while ago, but never got around to it.  I'm now determined to do so!

When I started planning my son's party, I knew my mother would be more than happy to jump on board.  She loves planning themed events.  There was a time while we were living in NJ when the running joke was that if there was a "holiday" to celebrate, she'd have a themed dinner for it.  Chinese New Years were always awesome, as were her many other events.  It's one of her creative outlets, me thinks.  But since the move to MD, the themed dinners seemed to tone down a bit, which is nice, but also something I miss.  I wanted this party to be easy to prepare without being skimpy.

This also being my son's first fully themed birthday, with games and party invites, made it just that little bit more special.  Sadly, three of the 6 kids we invited (only one being not related) couldn't attend, but I took this as a nice treat for the others and him, and a good practice run for his next birthday.  He's starting daycare next Tuesday, so there's a higher chance of more non-relative kids being invited.

My mother, husband, and I worked up many ideas, and in the end the party was a success.  We didn't get through all the games... the kids were worn out quickly all but my son and my youngest niece ended up taking naps!  :-p

The Invites

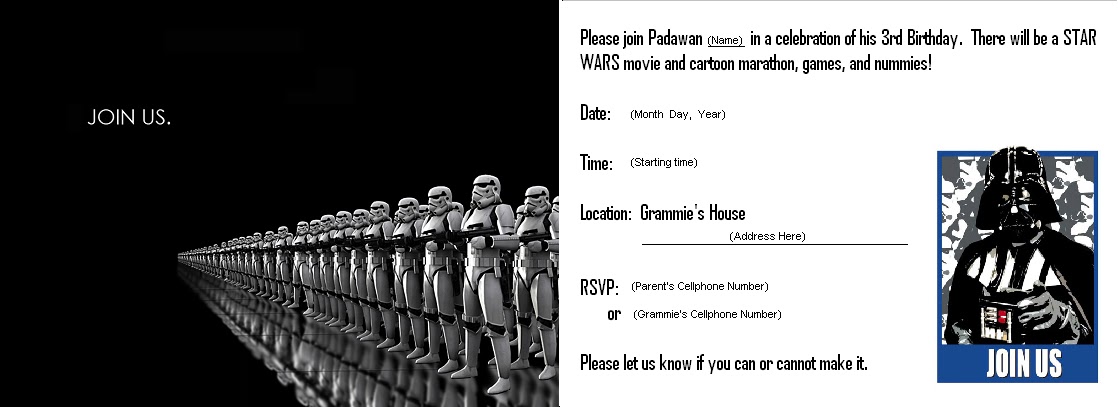
I altered the original images to use for the invites.
Original images from http://www.wallchan.com/ (left) and blogonsushine.blogspot.com (right)

As the invite shows, this party is more of a "Dark Side" or Empire themed Star Wars party.  My son was hooked on all the Star Wars films and the Clone Wars cartoons... but he mainly seemed to like Darth Vader, Boba Fett, and the Clone Troopers (and Storm Troopers by default).  I do see the irony thus far in calling him a Padawan in the invite.

The Dinner Menu

We scoured the internet and our own recipes to come up with ideas for party foods.  We came up with names for each item and my mother had tiny images printed out that we could attach to the food-name cards.  (She definitely thinks of details I completely forget about!)


Now for the menu details!!!

Death Star Cantaloup:  2 Cantaloups, one carved as the Death Star, the other being the remains of Alderaan.
Boba Fett-uccine:  Gluten-Free noodles w/ olive oil, butter, herbs, and shredded Parmesan cheese.
Obi-Wan Fruit Kabobs:  Strawberries, grapes, and marshmellows on skewers
Dagobah Salad:  Cold pea salad with cubes of cheeses
Bantha Ribs:  Ribs slow cooked (crockpot) in Bone Suckin' BBQ Sauce
Ewok Salad:  Salad greens with nuts, shredded carrots, raisons, and dried berries.  Mom made a homemade raspberry dressing.
Tusken Raider Taters:  Just some oven baked tater tots
Yoda Soda:  A green party punch with seltzer (for bubblies) and lemon sorbet on top
Chalmun's Canteena Coffee:  unsweetened vanilla flavored iced coffee (sugar on the side)


The Dessert Menu
Nothing says "Happy Birthday" like clones heads on pikes over bloody mounds of dirt!
Dark Side Birthday Boy Cake: Gluten Free chocolate and vanilla (dyed red) cake batters, marbled, with chocolate frosting Clone Ration Cakes: same batters as above, spooned into mason jars and cooked as cupcakes.  Topped with Clone Trooper Candy Pops, following this instructable with personal alterations.  May use a different method next time, as the kids loved the look but didn't like the taste of them.  (We also made Rex for the birthday boy, because Rex rocks!)
Cloud City Floats:  Rootbeer or Sprite topped with vanilla ice cream
Chewie's Chewy Chocolate Chip Cookies:  Cookies (some with and some without chocolate chips) cut into Star Wars shapes using these cookie cutters.

Vader says, "Come to the Dark Side. We have cookies."

Entertainment / Games
There were no prizes for "winning."
The idea was just to have fun!  It worked!
Star Wars Marathon:  We had all the Star Wars movies and the Clone Wars cartoons available.  I believe we started with the cartoons, and then switched to the movies after the kids started winding down (some having fallen to sleep).
Make A Light Saber:  Using foam swimming noodles (cut in half) and duct tape, the kids made their own light sabers to use for other games.
Jedi Vs. Sith:  Basically, we just let the kids beat on eachother using the foam light sabers they made.  No hits to the head and no tackling (except the kids tackling the adults).  Who were the Jedi and who were the Sith?  Who knows?  The point was just to have fun.  My brothers even joined in this one.
Feed The Rancor:  We took a large moving box (leftover from our move) and cut a hold in it.  My husband took some moving paper leftovers and drew a Rancor beast on it (from Episode 6: Return of the Jedi) and attached it to the box (with a whole for the mouth).  The kids threw bean bag type balls at it to see who could get the most in.
Death Star Scavenger Hunt:  Party favors wrapped in aluminum foil and hidden.  Each with a child's initial on it.
Light vs. Dark Balloon Pop:  Small party favors inserted into balloons.  Several clusters of balloons are tied to chairs and marked with a child's initial.  (These serve as place markers for the seats too!)  The children then pop the balloons, using toothpicks, to find their favor.
Jedi Training:  We didn't get to play this one, but the idea was that we had a bunch of small balloons blown up.  The kids would use their foam light sabers and try to keep the balloons off the ground.  They can keep trying until their balloons pop on the grass.  Sadly, the kids were worn out, so we didn't bother pulling the balloons out.
Birthday Boy Recruitment:  My husband pulled out the costume he made for a convention years ago, complete with voice changer.  It was a character he made up.  He threw it on so he could have an Empire type character give my son a Clone Trooper suit of armor which he made from cardboard and packing paper leftover from our move, which he sculpted and painted.  It turned out great and matched the Rex helmet we got him perfectly.  The best part was the look on my son's face when my husband appeared.  He thought my husband was "Boba Fett"!!!

If cookies weren't enough, the Dark Side also will send
some of their celebrities and a free set of custom made armor!

 
Decorations
My mother hate streamers, so we avoided those (this time!), but we hung up a bunch of Star Wars images, mostly in the style of WW1 and WW2 wartime propoganda posters.  The adults enjoyed reading them and getting the humor of them.  We also had balloons tacked and tied around the house and outside.


Overall Review
In the end, the party was a success.  The children and the adults had a good time.  The preparations were easy enough, but were definitely not lacking.  The food was delicious, the games fun.  The children were well occupied until they started running low on energy, and the adults were entertained with inside jokes, little bits of irony ("Your son will remember how Daddy was never around for his birthday cake." and "Great.  The Padawan turned Empire."), and movies that transcend age.
Image from http://www.joecorroney.com/

Monday, July 11, 2011

Completed Misc. Projects!

As usual, I've been busy making things while also working on other interests.  Here's a few of the projects I was working on.

I made some patriotic bloomers for my daughter's first Fourth of July.  I was actually going to make her a full outfit, but her Granpappy bought her a onesie from his visit to Washington D.C.  So I figured I'd make shorts to match the onesie... and I just happened to have the perfect remnant for it.  Actually, the pattern I used called for slightly more material, but I worked with it and the end result was adorable.  I also used stretchy cotton bias tape for the elastic casing; the bias tape was from the dragonfly onesie I partially unpicked for the oufit in my last post.  I plan to get a better picture, but this worked.


For my son, I was planning on making at least a pair of shorts for the holiday and to find one of the patriotic t-shirt hand-me-downs we have.  My mother's boyfriend (Granpappy) had also bought my son a shirt from Washington D.C., so I ended up making shorts to semi-match the shirt.  This outfit had a few firsts for me.  My first use of seersucker fabric.  My first applique. My first attempt to temporarily size down a t-shirt.


Here's the story... The store Granpappy was buying the onsie and t-shirt from only had this t-shirt in a size 4 and a size small (usually size 6).  Since my son is currently wearing size 4 to 5, my mom suggested he buy the size small.  The shirt was huge for him, but I figured that I could figure out a way to size it down, while allowing me to later undo my alterations so he can wear it for years more.  (If you click on the photos, you'll be able to see the alterations more clearly.  Just another case of an outfit I hope to take more pictures of!)


I didn't get any "before" pictures, but the "after" pictures show how well it turned out.  My mother said it looked like it was bought that way.  And her boyfriend was impressed enough that he came home with a shirt from the Monster Truck Rally he went to and said, "You can work your magic on this one!"  :-)

As for the shorts... my son loved them!  He actually wore them again a couple days ago with one of his Star Wars t-shirts.  I plan to make him a matching vest or shirt.  Either would be adorable.  (Maybe a matching hat?)

As a side, I made some really cute Fourth of July hair clips out of scraps (pictures later) and tried to rework a blue striped maternity top I love. I want it to be more flattering to my non-pregnant figure. This first attempt was a little rushed. I wore it on the Fourth of July, and though it looked less "maternity", it wasn't up to my standards for fit or quality, so I will be working on it more. Possibly even take it completely apart. We'll see.

Also, for a Refashioning Co-Op that I'm part of, I made a collar headband.  The group was having a book giveaway, and the theme was using scraps.  My husband likes to make Victorian style shirts, and if he's converting a modern shirt to be one, we end up with the collar, sad and lonely and begging to be used.  It seems happier now.

Before:

After:

I will probably put together a tutorials, with more photos, when I make another one.  I really liked how it turned out.

What's now on the list of "Try To Make"?
*  Rework the blue stripe maternity top
*  Alter pink stripe maternity top
Fried marble pendants and lace chokers
D&D dice pendants
*  Alter brown polkadot dress (into a top and skirt)?
*  More seersucker stuff for my son, daughter, possibly me and my husband too
*  Possibly convert small onesies into tanktop dresses for my daughter
*  Sketch jellyfish steampunk gown
Start work on Xmas gifts?
Build my photography portfolio (for my new artist facebook page)
*  Post about the Star Wars birthday party!

Saturday, May 7, 2011

Little Faerie Festival Monster to Elfling: Change of Plans

My son is still very much against the idea of the satyr or Cyclops legs.  The first time he seemed against it, I thought perhaps he was just tired.  I had my husband show him "Narnia: The Lion, The Witch, and The Wardrobe" so he could see Mr. Tumnus (the satyr).  He seemed to like the character, but when I showed him the fake fur and put it over his leg, he made it clear he didn't want it.

So, what to do???

After some thought and tossing around ideas, I think I've settled on continuing the Elfling costume.  A quick tunic, a belt, a cowl, and a fake fur cape.  Should be cooler but with more coverage for the skin.  I'm not sure how many of these pieces will be finished in time, but it will be interesting to find out.

The plus side of this change is that he can choose to be an elfling or he can choose to be a Viking (by simply leaving off the cowl and adding his Viking helmet)!

At least I have some direction with this now.

Thursday, May 5, 2011

Little Faerie Festival Monster: Drawback! Oh no!!!

The other night, I was looking at images of Satyrs , including a precious costume Jen Thompson (from Festive Attyre) made for her son years ago, and the Cyclops from "7th Voyage of Sinbad".  My son saw the picture on this blog and said, "Oh no!" for Sinbad (the little guy in the picture) and started humming the theme music.  When I showed him the fake fur and held it to his legs, he got really upset.  Even with the cute pictures of Jen Thompson's son, he was not digging the idea.

I think, perhaps this project may be a "no go" for the time being, but now I'm left in an odd spot as to what my kids should wear.  Heck, I'm not sure we'll even go, since we also have his birthday to plan and prep for!  *grumble*

We'll see.  I'm still very much deciding.

Monday, May 2, 2011

Little Faerie Festival Monster: Ideas


Cyclops from "The 7th Voyage of Sinbad"
I'm working on a costume idea for my son to wear to Faerie Festival.  It will be a special treat for his birthday.  But I'm stuck on what costume to make him.  My husband is making a cardboard Star Wars Clone Trooper outfit for him, so I could always make some "wings" for him to wear with it and he can be a clone fairie... But... I'm leaning towards making him something a bit more "traditional".

My son loves certain films and requests them.  Any of the Star Wars films (or even the cartoons) and also "The 7th Voyage of Sinbad" are top on his list.  He wakes up humming the theme song to Sinbad or the Empirial March from SW.

While working on my daughter's Spring/Summer Dress, I found a long scrap of fake fur I held onto to use as trim, but it got me thinking.  Why couldn't it be used for satyr or faun legs (from the greek mythos)?  And then I started really thinking...

... Why not make a costume based on the Cyclops from "The 7th Voyage of Sinbad"?

Granted, my son has two eyes and I'm not about to try to make it a one-eyed costume.  Well... then I have a couple of options.  I can either make the costume into a "triclops" by drawing an extra eye just above the space between his eyebrows or I can just use the bulk of the Cyclop's costume as inspiration.  I'm thinking I'll do the latter.

Here's what I'm hoping to do:
1.  Make the fur legs.
2.  Make shoe covers that look like a cloven hooves.
3.  Make a plush horn (or use one of my sculpi ones) for the horn or horns.  (I feel plush would be safer.)
4.  Figure out some sort of chest covering to block the bulk of exposed skin from the sun.

After I finish making my son's outfit, I hope to make some simple infant-safe fairy wings for my daughter out of cardboard so she can just wear a pretty dress and be a little faery.  Something uber fast, simple, safe, and cheap.

My deadline would be May 13th... so that gives me only a little wiggle room to get all this done!

Saturday, April 9, 2011

Creativity in the Works (aka. the Stitch-Itch)

Here's a list of projects I plan to work on as I get more situated and settled (and get my work stations set up) in my new apartment:
  • Set up a sewing/textile work station.  I'm thinking of using part of the "dining room" for this.
  • Set up a painting work area (though this may be a mostly "on the balcony" sort of thing.
  • Work on the commissioned portrait.  I need to find the supplies and reference materials, but that's covered in part by bullet #2.
  • Sort textile project supplies, which will also include items to be remade into other things.  Items needing to be mended will likely go here too, but in a "special" section to get priority (for the most part).
I am very inspired to by MADE of late.  Through that website, I also found Wardrobe Refashion, which is also inspiring, especially the challenge (with cute little button graphics to encourage you to stay on track).  And through that website, just as I'm writing this entry, I found Refashion Co-op which I hope to peruse more thoroughly.

I've wanted to remake various clothing items into new pieces for myself and my family, but kept holding back.  There were a number of factors involved: lack of space, lack of time, hesitancy for whatever reason.  But the urge has continued to increase.  Now I feel I can start.  And with the ideas on the sites listed above, I feel nearly ready.  The first project I might do, just to flex my "sewing muscles" is to transform a maternity shirt I have into a full outfit for my little girl.  I love that shirt because the cotton is soft and the color and fabric design is pleasing.  Stripes (which I'm a sucker for) in dark and medium blue.  So I am thinking about turning it into ruched leggings (using the tutorial from MADE) and a summer dress with ruffles for my daughter.  After that, I might make either a stuffed dragon for my son out selvage cloth, a shirt for him out of one of my old goth shirts, or a fairy outfit for my daughter's Faerie Festival dress out of a pink "special occasion" dress I have and only used a couple times.  Or... I can start piecing together a couple toddler quilts for both my kids.  As can be seen, I'm still a little undecided.  I also plan to make a number of cat toys.  :-)

As I posted on Facebook the other day, I've got the "stitch-itch" and I hope to get working on my projects soon.  :-)

Saturday, April 2, 2011

Toddler Renfest Jacket: Finished

I've been so busy with life that I haven't had time to update here.  The pregnancy, then birth of my daughter, and my relocation for my job just ate up most of my time and energy.

Regardless, I did complete my son's Renfest "Elfling" Jacket.

Here are the pictures of the jacket when we made our trip to the Maryland Renaissance Festival in early Fall 2010.  It was mostly complete, though the leaves still needed to be attached.  I was also going to add a cluster of keys to the hood's point but decided against it.  But the couching embroidery was complete and added a really nice touch to the jacket.  (Click here to see the jacket before the couching was done.)  Unfortunately, the weather was too warm when we went to MDRF for him to wear the jacket, but playing in my oldest sister's back yard the next morning was chilly, so he got to wear it then.  He had tried it on prior to this, and loved it, but this was an even better test run of the jacket.  He was very obviously happy and comfortable in it.  Warm on it's own but also roomy enough to layer on top of a hoodie or jacket for extra warmth in needed.  The range of movement it allowed was also perfect for a very active toddler.

And below is a picture from Halloween with him wearing the completed jacket.  I hope to find (or get) more pictures where the leaves are more visable, but you can see that the texture they added to the jacket.  They were very easy to make (each hand cut) and stitch on.  All the embroidery and each leaf was were handstitched.

The jacket was a hit, both with my son and with others.  My friend who owns Artifacts Boutique said I ought to make them to sell (both for Halloween, Festivals, and Christmas) and recommended I talk to one of her friends who owns a children's clothing store.  Yet I'm in no hurry for such things.  I used to make the wandcases for Mom Crosewl's Magic Shop at MDRF every year for several years while also working on various custom costume orders for a number of LARPers, Rennies, and Ebayers... It's nice to make things for myself and my family, with no real time limits except my own, no real pressure, on a whim and just for fun.  Accepting orders because I want to.

Another friend of mine thought I actually bought the jacket at a renfest.  Now... I tend to have mixed feelings about garments you find at renfest.  A few are places I recomment (like Moresca) because of the quality of their pieces, but most are not near my level of standards.  I know this may make me sound like a snob when it comes to buying costuming especially at festivals, but it's hard not to be when I know what to look at (in design, fit, fabric... quality and durability... straight stitches, clean lines, and properly snipped thread ends... and so on).  So when I sew, I try to keep my work well above what you would find at festivals.  Most of their stuff would be below the quality of my rushed prototypes.  We all have to have our personal standards, and this is mine.  That's not to say I don't give a lot of credit to people who sew, especially beginners... I just have a problem when it seems people being overcharged at festivals for what they are getting simply because the vast majority of shoppers don't know better.  But I believe that the comment was meant as a compliment, because for most people it is.  And that's how I will take it.  :-)

Now I'm working on figuring out some designs for other projects I hope to start and working out details on ongoing projects as well.  I will write about those soon. 

Wednesday, September 29, 2010

Toddler Renfest Jacket: The Beginning

My husband, son and I will very likely be going to the Maryland Rensaissance Festival (MDRF) this Saturday. Most of our costumes are things we already own. My husband will be wearing his kilt and the shirt I made (and embroidered) for him with the rest of his Scottish inpired garb. I will be a fairie of some sort or just some random rennie. My son will be wearing his Disney special edition Peter Pan costume that we bought him years ago in preparation for when he became interested in dress up. This outfit is actually really nice and stylized. (Kinda like Disney took inspiration from Lord of the Rings.)

My concern for my son's costume is if the weather gets chilly. It will be the first weekend of October, so one never knows. As such, I am making him an elven style jacket using the Butterick pattern B4319 (as shown above).

In the past, I didn't really give this particular pattern much notice, but it is perfect for the jacket idea, with a few alterations. It looks easy and quick (since I wouldn't have much time to make it given the last minute nature of the trip). The main alterations would be leaving the front open with cloth closures (to tie), fitting it down to my toddler's size (since the pattern size starts at "age 4") and making a point on the hood. I would also be adding some embroidery and stitching on some leaf cut outs.

The colors would be a dark drab green and a dark brown. Very appropriate. The cloth would be fleece, which doesn't need hemming, would be warm enough, is nice and soft, and was also on sale for a decent price. I actually have enough to make my son a hat and a cloak (which my husband may make, hopefully having the hat mostly done before the trip).
On Tuesday, my mother had our son over at her house for a few hours for their weekly "Grammie Time", which gave me time to work on the jacket and rest my back when I needed to. There was no way I'd be able to do the measuring and cutting with my son there. He likes to climb all over me and is very inquisitive... which I honestly don't mind but makes certain things difficult.

Attached are pictures of the stitched jacket. (Sorry if they seem a little dark and don't mind the unclipped threads.)


I decided to leave the sleeves and bottom unhemmed so it will hang straight without the stiffness that a hem would have created. Obviously, I had not added the closures or the embroidery.
My son got home just after I finished the last stitch. This pattern was incredibly easy and quick! My boy took a look at it and immediately expressed interest. He let me put it on him to see how it fit and then promptly put it on backwards after so it looked like a snuggie. *laughs* He was very happy with it thus far. The fit is perfect (with a little growing room too!) and the little point on the hood is adorable.

Last night, I started the embroidery. I had to change my tactics because the yarn I bought would not easy stitch into the fleece and I didn't want to waste time trying to force it. So, instead, I decided to use a couching stitch to attach it. Actually, the specific technique is called a bunched couching stitch. (Click here for examples of couching stitches.) It takes a bit of time, so I'm getting a bit nervous, but that's what I get for choosing to add embroidery to the project! I'm not going to do too much intricate work on it, but I have a bit more embroidery I want to add to it... though probably not adding any to the back. We'll see. I still have the leaves to cut and attach, but I'm thinking that the jacket will be fine for MDRF without them as long as I get the embroidery done. I'll decide that tonight.

Unfortunately, I don't have pictures of the embroidery yet.